April 16, 20259:00 am PDT • 12 pm EDTOther time zones shown here. Training Magazine…

During the 2024 CreativePro Week, Mike Parkinson gave a “Three Minutes Max” presentation about the parallax effect in presentations.
Using PowerPoint, he showed attendees how to easily level-up timeline graphics with this effect. See the GIF to the left for a quick preview.
Here are the basic steps to create this effect for your presentations:
- Import a background image wider than the slide into PowerPoint.
- Place your timeline graphic over the image.
- Duplicate the slide containing the image and graphic for as many steps as you need.
- Slightly move the background image to the left on each slide.
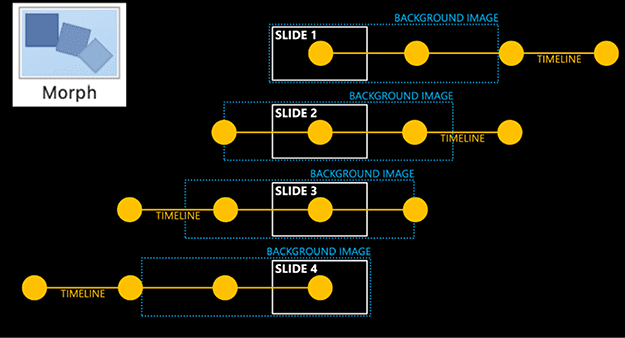
- Move the foreground graphic to the left so that each piece of the timeline is centered on your slide. You will be moving the graphic in larger increments than the background image.
- Apply the Morph transition effect to create the illusion of depth.
The figure below shows the steps described above. The amount of slides needed is relative to the steps in your timeline graphic. As with any effect, don’t overuse it. When you overuse a PowerPoint effect or transition, you risk losing its impact.

CreativePro published Mike’s full article detailing the parallax effect on their website.
In addition, you can watch the full video of Mike’s presentation on CreativePro’s YouTube channel.
Signup for a CreativePro membership to learn from Mike and many amazing creative professionals.


